

API documentation

General information
There are two environments for working with Vespia API: Development and Production.
Development environment dedicated to supporting the development of your application. It uses two endpoints for additional security measures - one for authentication and the other for data exchange.
- The authentication endpoint is https://dev-api.vespia.io/auth/graphql
- The data exchange endpoint is https://dev-api.vespia.io/my/graphql
The production environment, as the name says, is for using Vespia API on the production.
To switch from Development to production, you must change endpoints and repeat the SignIn step from authentication to get a new access token.
- The production authentication endpoint is https://api.vespia.io/auth/graphql
- The data exchange endpoint is https://api.vespia.io/my/graphql
All requests to this API must contain the authorization token:
1Authorization: Bearer $tokenIn this documentation, we are using the Development environment in the examples.
You can test data exchange API using the ApolloGraphQL client using this link. Alternatively, you can use Postman for tests. In this case, please make sure you use GraphQL Explorer to test the API, more details on how to use GraphQL with Postman: https://blog.postman.com/announcing-postmans-new-graphql-client/
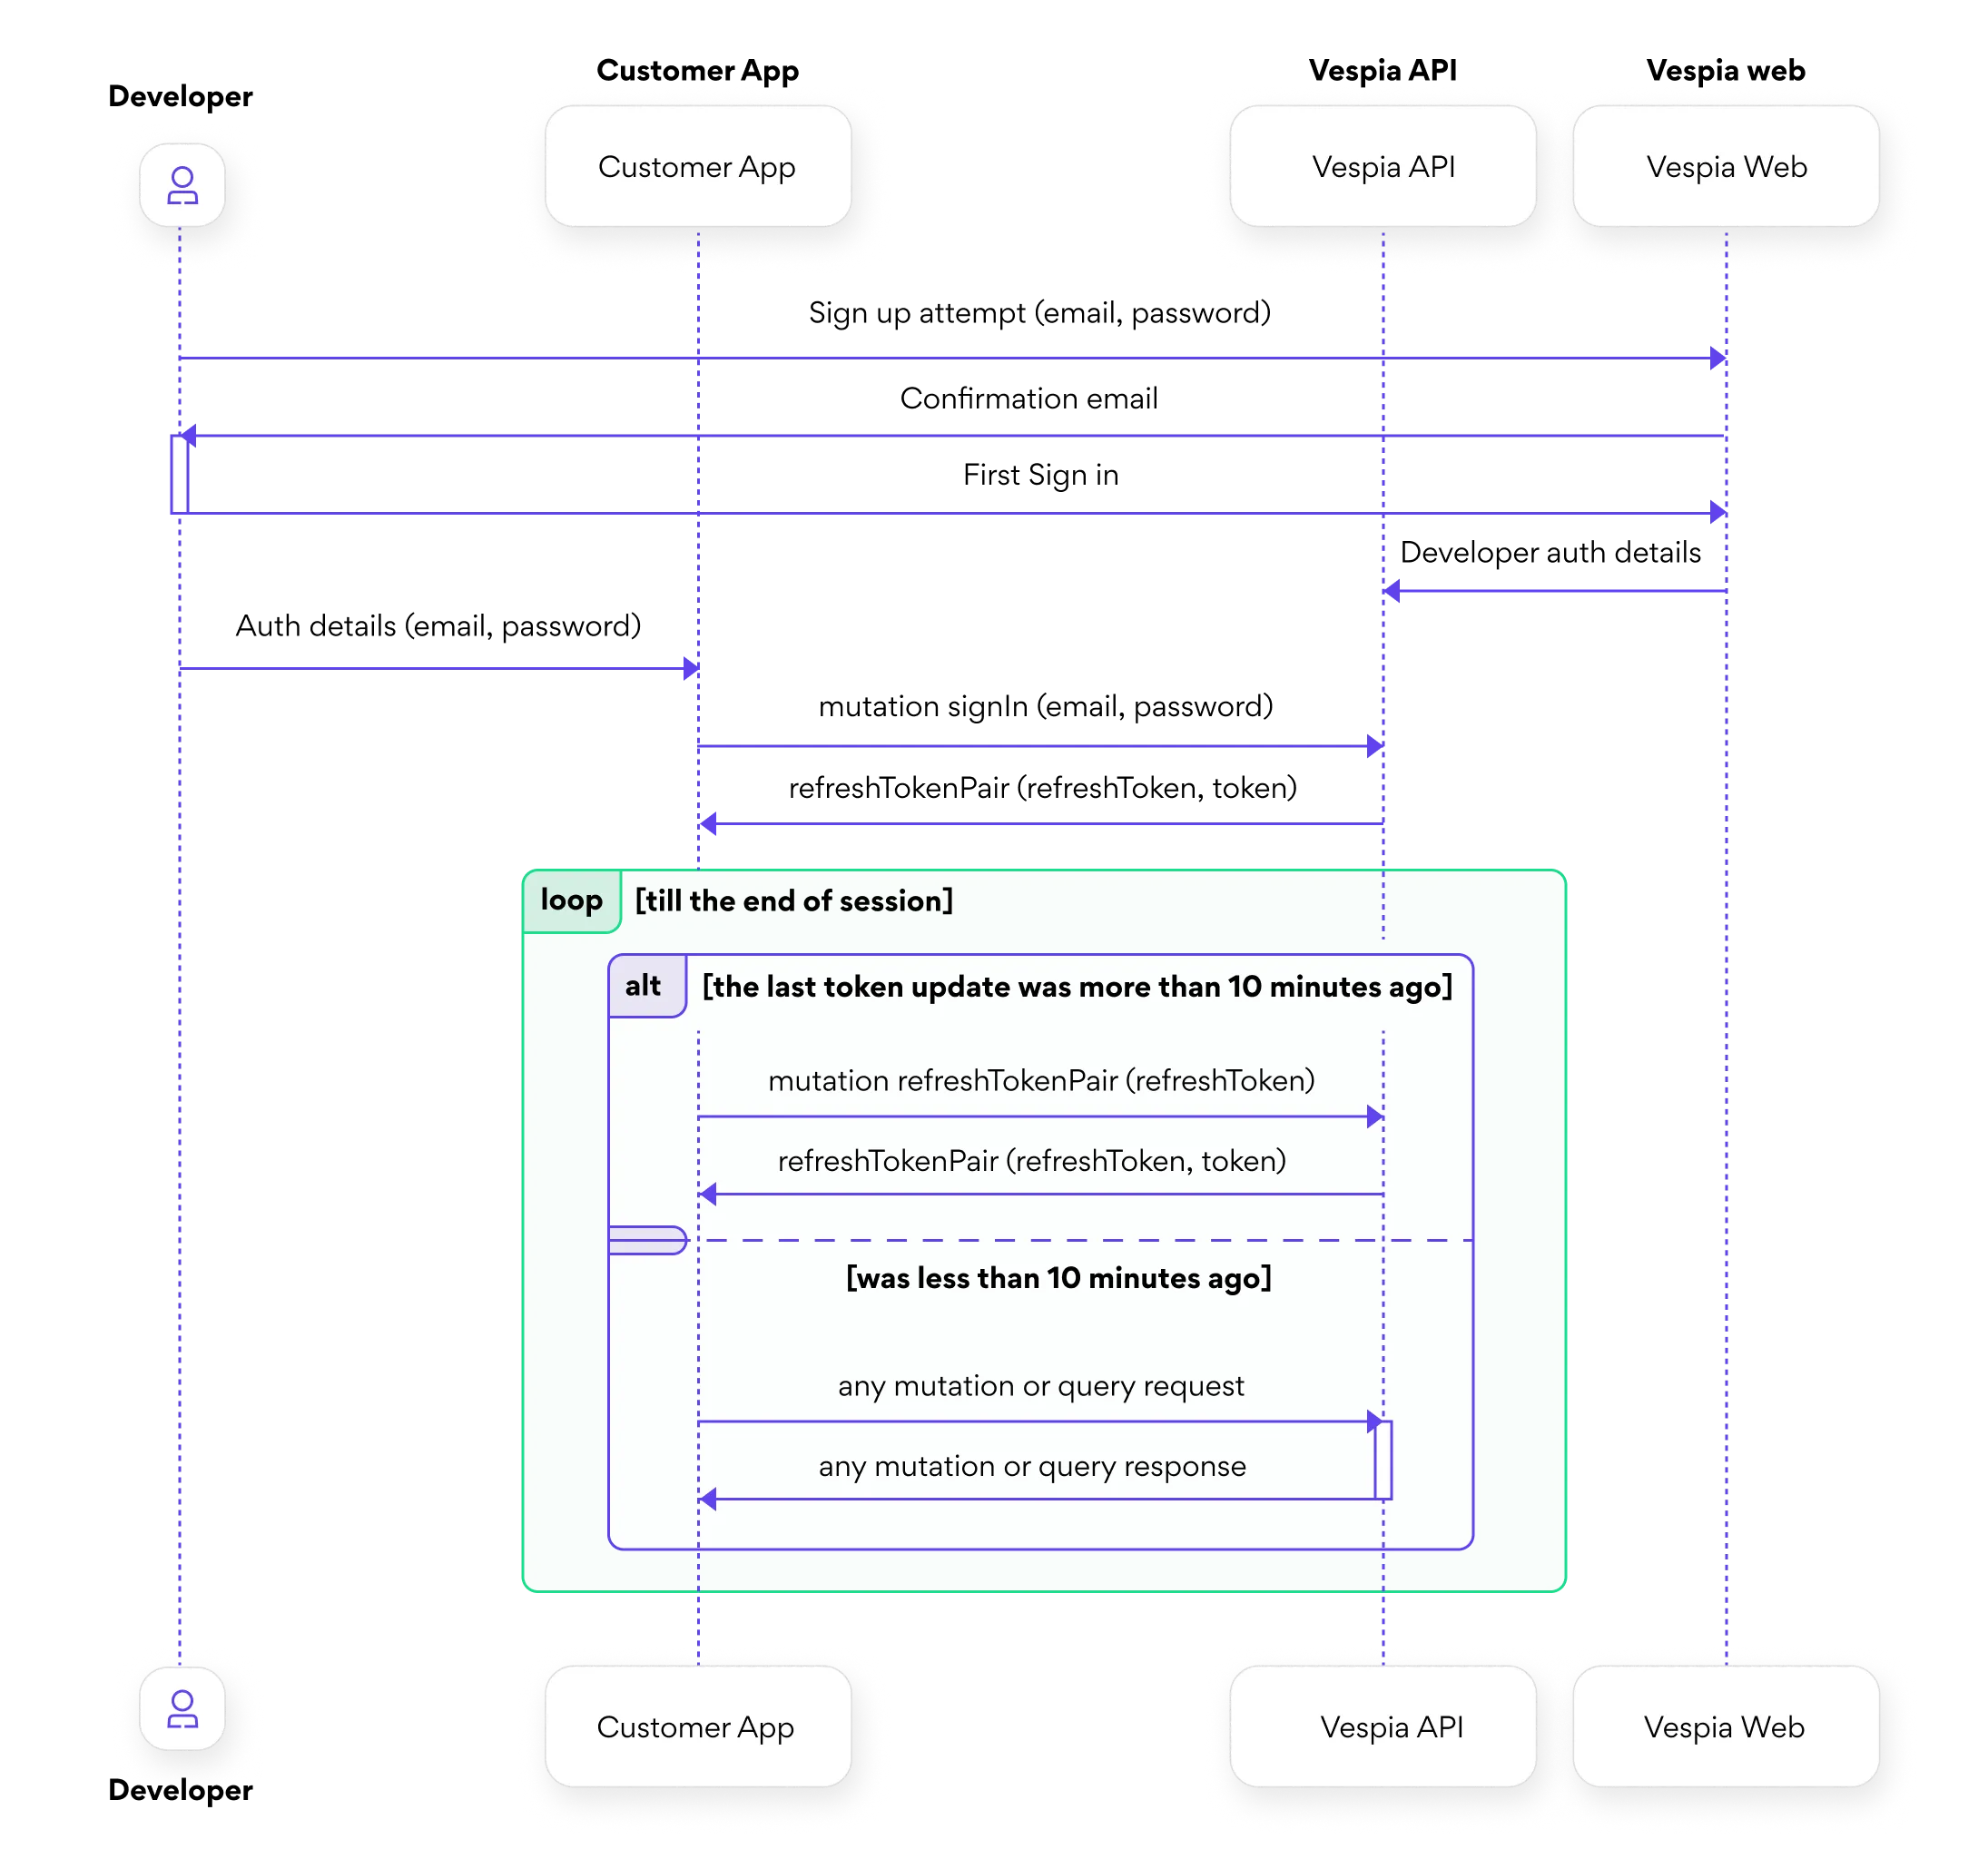
Authentication
To access the data exchange endpoint (https://dev-api.vespia.io/my/graphql) you must send the access token in the Authorization header of each request.
Access token and its update
- Start with registering in the system. For development purposes, please create an account at https://dev-my.vespia.io/sign-up. Remember your login email and password.
- To receive the access token, you should use the signIn mutation in GraphQL or HTTP request way.
⚠️Important: Your request must include the HTTP header - "Origin: https://vespia.io", when calling thesignInmutation. In backend scripts, CLI tools, or API clients (e.g. Postman, curl), you must add it manually. Requests without this header will be rejected.
- When you switch from the Development to the Production environment, please use your account created at https://my.vespia.io/sign-up
Operation example
1Authorization: Bearer $tokenVariables example
1{
2 "input": {
3   "email": "john@example.com",
4   "password": "E4Wd9Rdos-wij+$38weEE"
5 }
6}
Operation example
1{
2  "data": {
3    "refreshTokenPair": {
4      "refreshToken": "refresh-session:f82ec32d-e0c9-4846-8b64-8ca2d76514d1",
5      "token": "eyJhbGciOiJIUzI1NiIsInR5cCI6IkpXVCJ9.eyJhY2NvdW50SWQiOiIwZGI
6      4MTY1NS04OTNlLTRjZjUtYTMzOS0yMjM1YjY1YTE3NjkiLCJlbWFpbCI6ImFsb3ppbnNre
7      UBtZS5jb20iLCJpc0FkbWluIjpmYWxzZSwiYWNjb3VudEdyb3VwcyI6W10sImlhdCI6MTcwNzkyNz
8      M2MywiZXhwIjoxNzA4NTI3MzYzfQ.27w7yo496JwQshA3MyHQ37OyeGdE3yR0XCg2047CDAQ"
9    }
10  }
11}
Object types and field descriptions.
For security reasons, the access token expires within 10 minutes. After that time, you have to refresh it using the
refreshTokenPair mutation.Operation example
1mutation refreshTokenPair ($input: RefreshTokenPairInput!) {
2 refreshTokenPair(input: $input) {
3   refreshToken
4   token
5 }
6}
Variables example
1{
2 "input": {
3   "email": "john@example.com",
4   "password": "E4Wd9Rdos-wij+$38weEE"
5 }
6}
Object types and field descriptions
Diagram
The built-in playground is a user interface that allows developers to interact with the authentication-related queries and mutations of a GraphQL API. It displays all available queries and mutations, along with the parameters that can be passed and the data that is returned. This makes it easy to test and debug authentication-related code and see the results in real-time.
All available queries and mutations with arguments and returned fields can be viewed by following this link or by pressing the Expand button in the sandbox.
Playground
Country coverage by zone
Last update April 2, 2026
Verification procedure
Companies search
Company search is an essential step before performing KYB verification. A company search should be conducted for the following reasons:
• It is necessary to ensure that the company's data exists in the registrar's records so that a request for detailed company information can be made in the next step;
• When requesting KYB verification, it is mandatory to provide the company's registration code. Therefore, if you do not know the exact registration code or are unsure of its correctness, you need to perform a company search. The response will return the exact registration code for further use;
A company search can be performed using either the company name or the registration code.
You can perform a search using both the company name and the registration code simultaneously. However, if you do not use one of the parameters, simply omit this field from the request instead of passing an empty string.
The
• Use ISO 3166-1 alpha-2 codes for countries (e.g.,
• Use ISO 3166-2 codes for sub-national jurisdictions when applicable (e.g., US states or Canadian provinces).
countryCode parameter is required for all company search requests. It must follow the ISO 3166 standard: • Use ISO 3166-1 alpha-2 codes for countries (e.g.,
DE, FR, US, GB, CA)• Use ISO 3166-2 codes for sub-national jurisdictions when applicable (e.g., US states or Canadian provinces).
Country code examples
To perform a company search, use the
SearchLegalEntities query. The response will contain a searchLegalEntities field, which is an array that includes all matching company search results. You will then need to select the most suitable result for your needs.⚠️Important: When selecting a company from the
The selected company object must be passed as an input parameter for the
searchLegalEntities array, you must choose the correct company based on its registrationCode. Once selected, you should pass the entire object from the array, as it contains all relevant company data. This is crucial because the object may include additional details required for the KYB request, such as an extra kybResponseId.The selected company object must be passed as an input parameter for the
mutation RequestKybVerification. This ensures that all necessary company details, including possible additional kybResponseId fields, are included in the KYB verification request (Example is in the KYB verification (Business) section).Operation example
1query SearchLegalEntities($input: SearchLegalEntitiesInput!) {
2  searchLegalEntities(input: $input) {
3    name
4    registrationCode
5    countryCode
6    kybResponseId
7  }
8}
Variables example
1{
2  "input": {
3    "name": "Vespia",
4    "registrationCode": "16017942",
5    "countryCode": "EE",
6  }
7}
8
9---OR---
10
11{
12  "input": {
13    "name": "Vespia",
14    "countryCode": "EE",
15  }
16}
17
18---OR---
19
20{
21  "input": {
22    "registrationCode": "16017942",
23    "countryCode": "EE",
24  }
25}
Response example
1{
2  "data": {
3    "searchLegalEntities": [
4      {
5        "name": "Vespia OÜ",
6        "registrationCode": "16017942",
7        "countryCode": "EE",
8        "kybResponseId": null
9      },
10      .......
11    ]
12  }
13}
Object types and field descriptions
KYB verification (Business)
Note: Registry responses are dependent on the data available from each national business register. The structure, fields, and level of detail returned may vary by jurisdiction.
To perform business verification (KYB), you must start with the
To perform business verification (KYB), you must start with the
requestKybVerification mutation. It returns an array of EntityCheck objectsOperation example
1mutation RequestKybVerification($input: RequestKybVerificationInput!) {
2 requestKybVerification(input: $input) {
3   id
4   type
5   status
6   result
7   dataRequestInfo
8   dataRequestId
9   folderId
10   comment
11   input
12   createdAt
13   updatedAt
14   expiredAt
15   account {
16     id
17     groupId
18   }
19 }
20}
Variables example
1{
2 "input": {
3   "countryCode": "EE",
4   "name": "Vespia",
5   "registrationCode": "EE102360253",
6   "kybResponseId": null
7 }
8}
Response example
1{
2 "data": {
3   "requestKybVerification": [
4     {
5       "id": "09130a7e-a06c-4256-a83e-390431ffb294",
6       "type": "BUSINESS_INFO",
7       "status": "AWAITING_CHECK",
8       "result": null,
9       "dataRequestInfo": null,
10       "dataRequestId": "32689c3b-3bf3-483f-9825-44d4961d8cbb",
11       "folderId": "21831f3d-ca25-44a0-9096-f77d34340d1f",
12       "comment": null,
13       "input": {
14         "name": "Vespia",
15         "countryCode": "EE",
16         "registrationCode": "EE102360253",
17         "account": {
18           "accountId": "0db81655-893e-4cf5-a339-2235b65a1769"
19         },
20         "folderId": "21831f3d-ca25-44a0-9096-f77d34340d1f",
21         "isCorporate": true
22       },
23       "createdAt": "2024-02-18T10:51:30.320Z",
24       "updatedAt": "2024-02-18T10:51:30.320Z",
25       "expiredAt": null,
26       "account": {
27         "id": "0db81655-893e-4cf5-a339-2235b65a1769",
28         "groupId": null
29       }
30     },
31     {
32       "id": "584779fd-908e-4ff3-9c74-c4fa7b7014dd",
33       "type": "UBO",
34       "status": "AWAITING_CHECK",
35       "result": null,
36       "dataRequestInfo": null,
37       "dataRequestId": "7afd17cb-99b3-4c07-bd16-3838e8d9366c",
38       "folderId": "21831f3d-ca25-44a0-9096-f77d34340d1f",
39       "comment": null,
40       "input": {
41         "name": "Vespia",
42         "countryCode": "EE",
43         "registrationCode": "EE102360253",
44         "account": {
45           "accountId": "0db81655-893e-4cf5-a339-2235b65a1769"
46         },
47         "folderId": "21831f3d-ca25-44a0-9096-f77d34340d1f",
48         "isCorporate": true
49       },
50       "createdAt": "2024-02-18T10:51:30.320Z",
51       "updatedAt": "2024-02-18T10:51:30.320Z",
52       "expiredAt": null,
53       "account": {
54         "id": "0db81655-893e-4cf5-a339-2235b65a1769",
55         "groupId": null
56       }
57     },
58     {
59       "id": "fd5f3a0a-f8a8-42db-afcc-916c1bd5dcf9",
60       "type": "VAT",
61       "status": "AWAITING_CHECK",
62       "result": null,
63       "dataRequestInfo": null,
64       "dataRequestId": "eaa13b12-d577-4d71-8df7-70b366420407",
65       "folderId": "21831f3d-ca25-44a0-9096-f77d34340d1f",
66       "comment": null,
67       "input": {
68         "countryCode": "EE",
69         "name": "Vespia"
70       },
71       "createdAt": "2024-02-18T10:51:30.320Z",
72       "updatedAt": "2024-02-18T10:51:30.320Z",
73       "expiredAt": null,
74       "account": {
75         "id": "0db81655-893e-4cf5-a339-2235b65a1769",
76         "groupId": null
77       }
78     }
79   ]
80 }
81}
Object types and field descriptions
Diagram
BUSINESS_INFO response example
1{
2   "name": "Vespia OÜ",
3   "registrationCode": 16017942,
4   "country": "Estonia",
5   "address": "Harju maakond, Tallinn, Põhja-Tallinna linnaosa, Niine tn 11, 10414",
6   "isCorporate": true,
7   "kmkr": "EE102360253",
8   "legalForm": "OÜ",
9   "businessActivity": "62.10 - Computer programming activities",
10   "status": "Entered into the register",
11   "incorporateDate": "2020-07-28T00:00:00.000Z",
12   "capital": "10350.66 EUR",
13   "financialYear": {
14      "date": {
15         "start": "2024-01-01T00:00:00.000Z",
16         "end": "2024-12-31T00:00:00.000Z"
17      }
18   },
19   "numberOfEmployees": 2,
20   "predecessors": [
21      "Kanne on tehtud äriregistri seaduse § 70 lõike 1 alusel."
22   ],
23   "contacts": {
24      "emails": [
25         "info@vespia.io"
26      ],
27      "websites": [
28         "https://vespia.io/"
29      ],
30      "phoneNumbers": [
31      ],
32      "faxes": [
33      ]
34   },
35   "rights": {
36      "representation": [
37         "Every member of the Management Board may represent the private limited company in concluding all transactions."
38      ]
39   },
40   "extraData": {
41      "kmkr": "EE102360253"
42   },
43   "relatedEntities": [
44      {
45         "name": "Kaarel Kotkas",
46         "registrationCode": "39409301919",
47         "isCorporate": false,
48         "relation": {
49            "roles": [
50               "Management board member"
51            ],
52            "date": {
53               "start": "2026-03-03T00:00:00.000Z"
54            }
55         }
56      },
57      {
58         "name": "Julia Ront",
59         "registrationCode": "49202210286",
60         "country": "Estonia",
61         "isCorporate": false,
62         "share": {
63            "size": 2500,
64            "currency": "EUR",
65            "type": "Sole property"
66         },
67         "relation": {
68            "roles": [
69               "Founder"
70            ],
71            "date": {
72               "start": "2020-07-28T00:00:00.000Z"
73            }
74         }
75      },
76      {
77         "name": "Veriff OÜ",
78         "registrationCode": "12932944",
79         "country": "Estonia",
80         "isCorporate": true,
81         "share": {
82            "size": 10350.66,
83            "currency": "EUR",
84            "type": "Sole property",
85            "percentage": 100
86         },
87         "relation": {
88            "roles": [
89               "Shareholder"
90            ],
91            "date": {
92               "start": "2026-02-13T00:00:00.000Z"
93            }
94         }
95      }
96   ]
97}
BUSINESS_INFO JSON Schema
1{
2  "type": "object",
3  "properties": {
4    "name": { "type": "string" },
5    "registrationCode": { "type": "string" },
6    "country": { "type": "string" },
7    "address": { "type": "string" },
8    "isCorporate": { "type": "boolean" },
9
10    "legalForm": { "type": "string" },
11    "businessActivity": { "type": "string" },
12    "status": { "type": "string" },
13    "incorporateDate": { "type": "string" },
14
15    "relatedEntities": {
16      "type": "array",
17      "items": {
18        "type": "object",
19        "properties": {
20          "name": { "type": "string" },
21          "registrationCode": { "type": "string" },
22          "country": { "type": "string" },
23          "address": { "type": "string" },
24          "isCorporate": { "type": "boolean" },
25
26          "share": {
27            "type": "object",
28            "properties": {
29              "type": { "type": "string" },
30              "size": { "oneOf": [{ "type": "string" }, { "type": "number" }] },
31              "currency": { "type": "string" },
32              "percentage": { "type": "string" },
33              "paid": { "type": "string" }
34            }
35          },
36
37          "ownershipPercentage": { "type": "string" },
38
39          "personalData": {
40            "type": "object",
41            "properties": {
42              "birthDay": { "type": "string" },
43              "localName": { "type": "string" },
44              "firstName": { "type": "string" },
45              "lastName": { "type": "string" },
46
47              "contacts": {
48                "type": "object",
49                "properties": {
50                  "emails": { "type": "array", "items": { "type": "string" } },
51                  "websites": { "type": "array", "items": { "type": "string" } },
52                  "phoneNumbers": { "type": "array", "items": { "type": "string" } },
53                  "faxes": { "type": "array", "items": { "type": "string" } },
54                  "socialNetworks": { "type": "array", "items": { "type": "string" } }
55                }
56              },
57
58              "nation": { "type": "string" },
59              "residenceCountry": { "type": "string" },
60              "placeOfbirth": { "type": "string" },
61
62              "identityDocument": {
63                "type": "object",
64                "properties": {
65                  "documentType": { "type": "string" },
66                  "documentNumber": { "type": "string" },
67                  "documentIssuedBy": { "type": "string" }
68                }
69              }
70            }
71          },
72
73          "relation": {
74            "type": "object",
75            "properties": {
76              "roles": { "type": "array", "items": { "type": "string" } },
77              "representationRights": { "type": "string" },
78
79              "rights": {
80                "type": "object",
81                "properties": {
82                  "representation": { "type": "array", "items": { "type": "string" } },
83                  "meansOfControl": { "type": "array", "items": { "type": "string" } },
84                  "signature": { "type": "boolean" },
85                  "filingCapability": { "type": "boolean" }
86                }
87              },
88
89              "date": {
90                "type": "object",
91                "properties": {
92                  "start": { "type": "string" },
93                  "end": { "type": "string" }
94                }
95              },
96
97              "isPre1992AppointmentForGB": { "type": "boolean" }
98            }
99          },
100
101          "providedRole": { "type": "string" },
102          "occupation": { "type": "string" },
103          "personStatus": { "type": "string" },
104          "metaDetails": {
105            "type": "object",
106            "additionalProperties": { "type": "string" }
107          }
108        },
109        "required": ["name", "isCorporate"]
110      }
111    },
112
113    "registerCourt": { "type": "string" },
114    "jurisdiction": { "type": "string" },
115    "residency": { "type": "string" },
116    "capital": { "type": "string" },
117    "paidUpCapital": { "type": "string" },
118    "numberOfShares": { "type": "string" },
119    "authorizedCapital": { "type": "string" },
120
121    "extraData": {
122      "type": "object",
123      "properties": {
124        "otherName": { "type": "string" },
125        "translatedAddress": { "type": "string" },
126        "oldName": { "type": "string" },
127        "lei": { "type": "string" },
128        "englishName": { "type": "string" },
129        "dissolutionDate": { "type": "string" },
130        "predecessors": { "type": "array", "items": { "type": "string" } },
131        "kmkr": { "type": "string" },
132        "registrationInstitution": { "type": "string" }
133      }
134    },
135
136    "assignees": { "type": "array", "items": { "type": "string" } },
137
138    "financialYear": {
139      "type": "object",
140      "properties": {
141        "date": {
142          "type": "object",
143          "properties": {
144            "start": { "type": "string" },
145            "end": { "type": "string" }
146          }
147        }
148      }
149    },
150
151    "contacts": {
152      "type": "object",
153      "properties": {
154        "emails": { "type": "array", "items": { "type": "string" } },
155        "websites": { "type": "array", "items": { "type": "string" } },
156        "phoneNumbers": { "type": "array", "items": { "type": "string" } },
157        "faxes": { "type": "array", "items": { "type": "string" } },
158        "socialNetworks": { "type": "array", "items": { "type": "string" } }
159      }
160    },
161
162    "rights": {
163      "type": "object",
164      "properties": {
165        "representation": { "type": "array", "items": { "type": "string" } },
166        "meansOfControl": { "type": "array", "items": { "type": "string" } },
167        "signature": { "type": "boolean" },
168        "filingCapability": { "type": "boolean" }
169      }
170    },
171
172    "numberOfEmployees": {
173      "oneOf": [{ "type": "number" }, { "type": "string" }]
174    },
175
176    "liquidated": { "type": "boolean" },
177    "hasInsolvencyHistory": { "type": "boolean" },
178    "hasCharges": { "type": "boolean" },
179    "hasPSCS": { "type": "boolean" },
180    "hasUndeliverableAddress": { "type": "boolean" },
181    "registeredOfficeIsInDispute": { "type": "boolean" },
182
183    "source": {
184      "type": "object",
185      "properties": {
186        "sourceName": { "type": "string" },
187        "sourceUrl": { "type": "string" },
188        "dateOfData": { "type": "string" }
189      }
190    },
191
192    "mostRecentData": {
193      "type": "object",
194      "properties": {
195        "mostRecent": { "type": "array", "items": { "type": "string" } }
196      },
197      "required": ["mostRecent"]
198    },
199
200    "previousNames": {
201      "type": "array",
202      "items": {
203        "type": "object",
204        "properties": {
205          "companyName": { "type": "string" },
206          "startDate": { "type": "string" },
207          "endDate": { "type": "string" }
208        }
209      }
210    },
211
212    "alternativeNames": {
213      "type": "array",
214      "items": {
215        "type": "object",
216        "properties": {
217          "companyName": { "type": "string" },
218          "language": { "type": "string" },
219          "startDate": { "type": "string" }
220        }
221      }
222    },
223
224    "officeType": { "type": "string" },
225
226    "companyIdentifiers": {
227      "type": "array",
228      "items": {
229        "type": "object",
230        "properties": {
231          "companyIdentifierCodeName": { "type": "string" },
232          "companyIdentifierUID": { "type": "string" }
233        }
234      }
235    },
236
237    "mainSourceName": { "type": "string" },
238    "requestTime": { "type": "string" },
239    "lastUpdate": { "type": "string" },
240    "currency": { "type": "string" },
241    "mainSourceAdditionnalInfo": { "type": "string" },
242    "taxCode": { "type": "string" },
243    "ownershipType": { "type": "string" },
244    "dateOfLicense": { "type": "string" },
245    "managingDirectors": { "type": "string" },
246    "additionalBusinessPurpose": { "type": "array", "items": { "type": "string" } },
247    "reportUrl": { "type": "string" },
248    "lastFinancialStatementType": { "type": "string" },
249    "lastFinancialStatementMadeUpTo": { "type": "string" },
250    "businessNumberABN": { "type": "string" },
251    "asic": { "type": "string" },
252    "siretNumber": { "type": "string" },
253    "pesel": { "type": "string" },
254    "regon": { "type": "string" },
255    "reference": { "type": "string" },
256    "dateOfRegistration": { "type": "string" },
257    "businessStartDate": { "type": "string" },
258    "businessEndDate": { "type": "string" },
259    "nextFilingDueDate": { "type": "string" },
260    "companySignatoryRights": { "type": "string" },
261    "lastPublicAnnouncementDate": { "type": "string" },
262
263    "latestAccounts": {
264      "type": "object",
265      "properties": {
266        "accountsCategory": { "type": "string" },
267        "accountsNextDueDate": { "type": "string" },
268        "accountsLastMadeUpDate": { "type": "string" },
269        "accountsOverdue": { "type": "string" },
270        "accountsReferenceDate": { "type": "string" },
271        "accountsMadeUpDate": { "type": "string" }
272      }
273    },
274
275    "companyBranchStatus": { "type": "string" },
276    "branchesDetails": { "type": "array", "items": { "type": "string" } },
277    "registeredOfficeAddress": { "type": "string" },
278
279    "equityStructure": {
280      "type": "array",
281      "items": {
282        "type": "object",
283        "properties": {
284          "type": { "type": "string" },
285          "size": { "oneOf": [{ "type": "string" }, { "type": "number" }] },
286          "currency": { "type": "string" },
287          "percentage": { "type": "string" },
288          "paid": { "type": "string" }
289        }
290      }
291    },
292
293    "metaDetails": {
294      "type": "object",
295      "properties": {
296        "additionalDetails": {
297          "type": "array",
298          "items": {
299            "type": "object",
300            "properties": {
301              "type": { "type": "string" },
302              "data": {
303                "type": "array",
304                "items": {
305                  "type": "object",
306                  "additionalProperties": { "type": "string" }
307                }
308              }
309            },
310            "required": ["type", "data"]
311          }
312        }
313      },
314      "additionalProperties": {
315        "oneOf": [
316          { "type": "string" },
317          {
318            "type": "array",
319            "items": {
320              "type": "object",
321              "properties": {
322                "type": { "type": "string" },
323                "data": {
324                  "type": "array",
325                  "items": {
326                    "type": "object",
327                    "additionalProperties": { "type": "string" }
328                  }
329                }
330              },
331              "required": ["type", "data"]
332            }
333          }
334        ]
335      }
336    }
337  },
338  "required": [
339    "name",
340    "isCorporate",
341    "legalForm",
342    "businessActivity",
343    "status",
344    "registrationCode",
345    "incorporateDate",
346    "relatedEntities"
347  ]
348}
KYC verification (Person)
To perform customer verification (KYC), you must start with the
requestKycVerification mutation. It returns an array of EntityCheck objectsOperation example
1{
2 "input": {
3   "country": "UK",
4   "gender": "male",
5   "kind": "ID",
6   "name": [
7     "Boris",
8     "Johnson"
9   ],
10   "dob": "June 19, 1964",
11   "email": "boris.johnson@example.com"
12 }
13}
Variables example
1{
2 "data": {
3   "requestKycVerification": [
4     {
5       "id": "90b75ea3-0bc6-4f80-a633-6bf79c01616a",
6       "type": "ID",
7       "status": "AWAITING_CHECK",
8       "result": null,
9       "dataRequestInfo": null,
10       "dataRequestId": "d3c56dbf-4d52-4b97-b75c-a3fb59bee3cd",
11       "folderId": "878e1dae-6601-4f76-a33d-376fb0136929",
12       "comment": null,
13       "input": {
14         "sendEmailNotification": true,
15         "name": "Boris Johnson",
16         "email": "boris.johnson@example.com",
17         "dob": "June 19, 1964",
18         "gender": "male",
19         "country": "UK",
20         "account": {
21           "accountId": "0db81655-893e-4cf5-a339-2235b65a1769"
22         },
23         "folderId": "878e1dae-6601-4f76-a33d-376fb0136929",
24         "isCorporate": false
25       },
26       "createdAt": "2024-02-18T13:35:34.137Z",
27       "updatedAt": "2024-02-18T13:35:34.137Z",
28       "expiredAt": null,
29       "account": {
30         "id": "0db81655-893e-4cf5-a339-2235b65a1769",
31         "groupId": null
32       }
33     }
34   ]
35 }
36}
Object types and field descriptions
Diagram
Playground
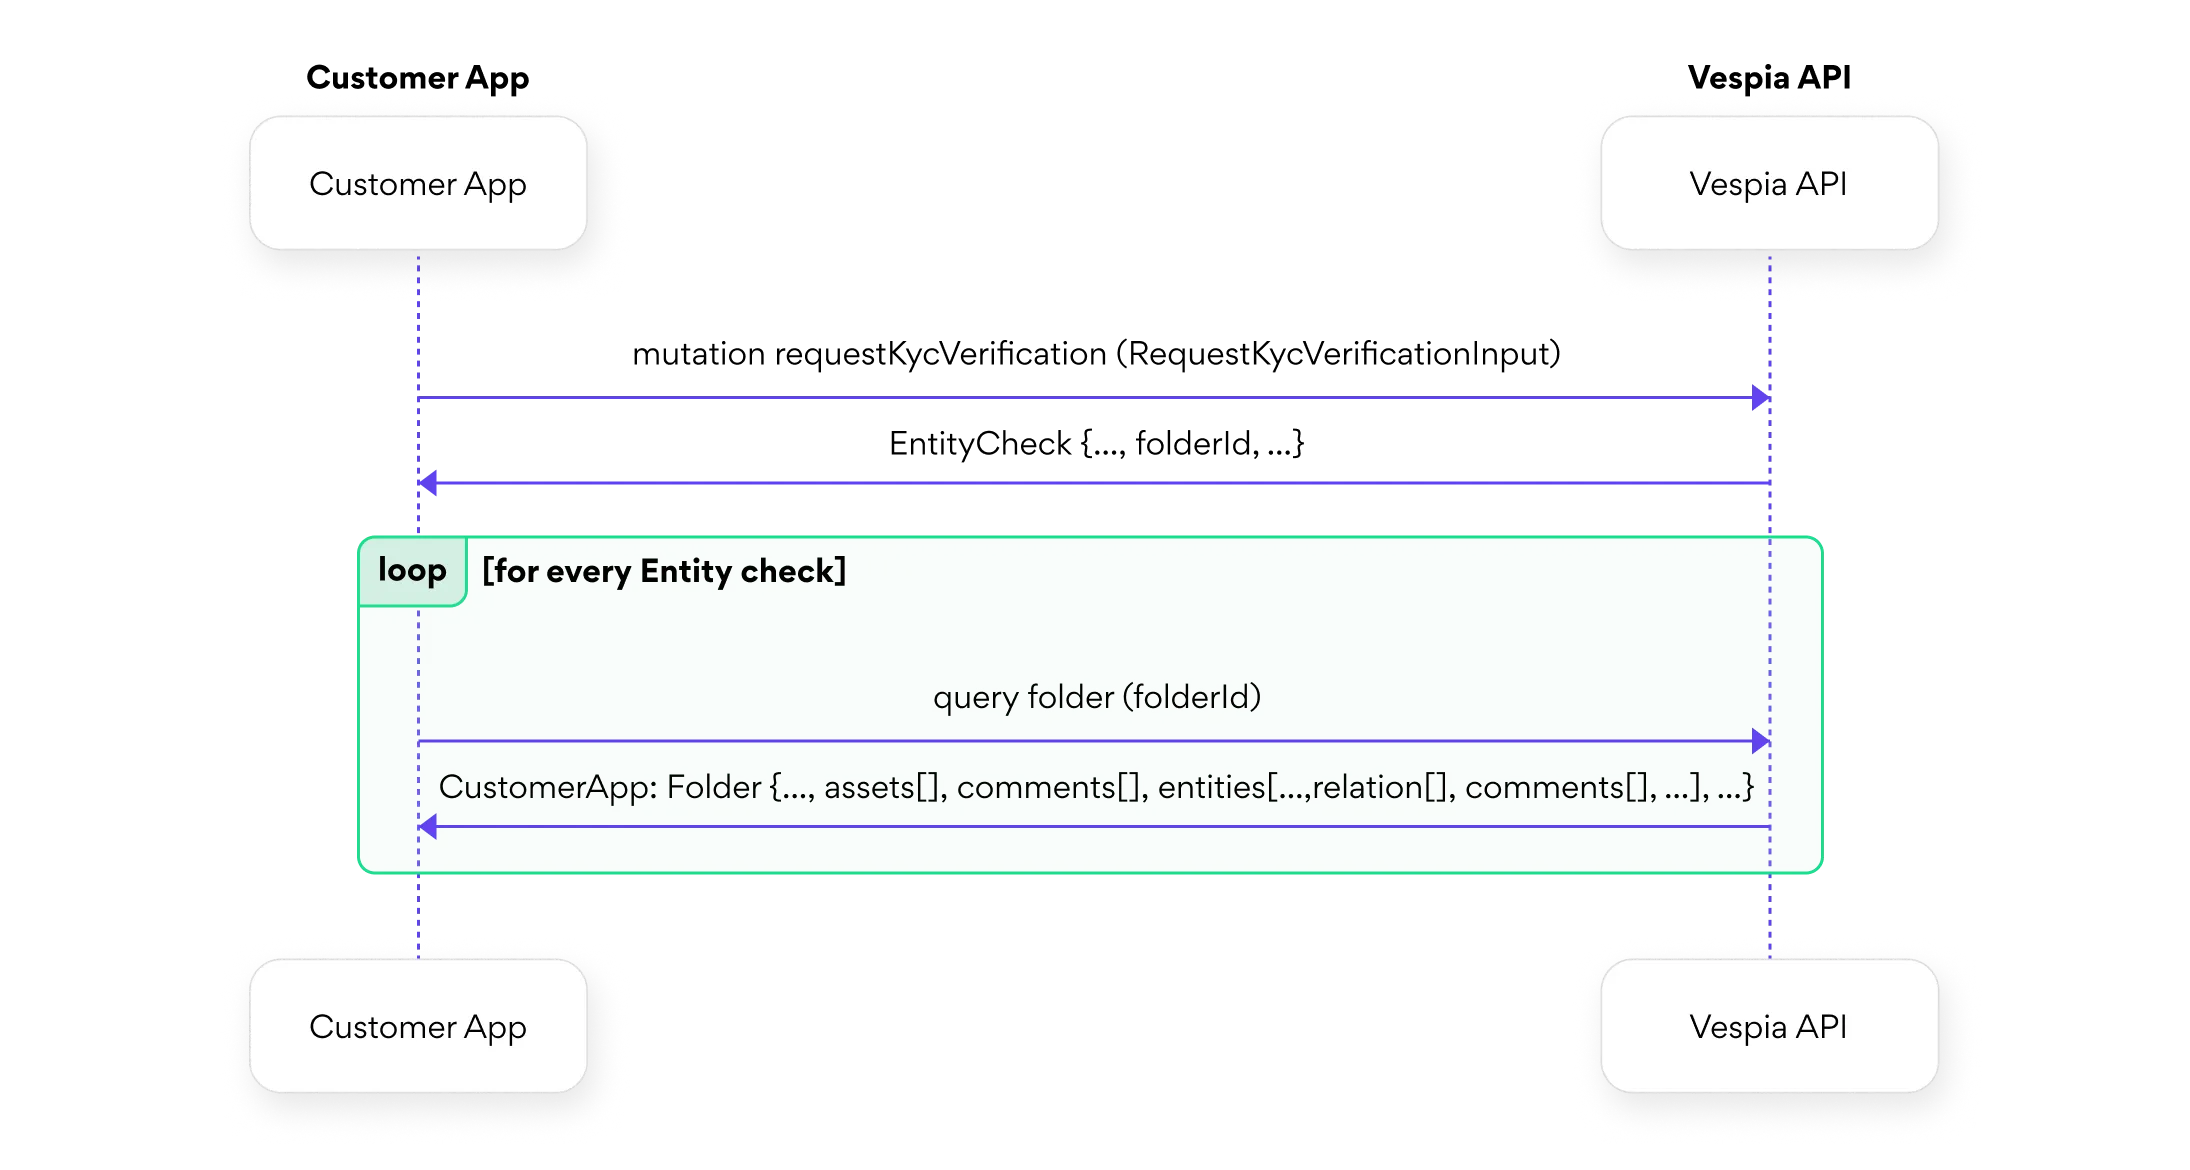
More information about checks
To get more information about every check from the array
When all entity checks are completed in a Folder, the status field in the response to the query Folder should be Completed. Accordingly, you will be able to find the results of all checks, such as AML, in the response.
When you make a folder request, the response contains one of the fields, which is called
EntityCheck, use the query Folder with the correspondent value of folderId as the argument. In this context, a folder should be considered a global entity that contains all the information about your verification.When all entity checks are completed in a Folder, the status field in the response to the query Folder should be Completed. Accordingly, you will be able to find the results of all checks, such as AML, in the response.
When you make a folder request, the response contains one of the fields, which is called
entities, it contains an array. Entities are all persons and companies that belong to the company you are checking. Accordingly, in this array of entities, each entity contains entityChecks, these are checks that you performed on the entity, for example, AML or ID.Operation example
1query Folder($folderId: UUID!) {
2  folder(id: $folderId) {
3    id
4    name
5    subCustomerEmail
6    account {
7      id
8      email
9      createdAt
10      updatedAt
11      profile
12      accountGroups {
13        id
14        name
15        domain
16        isProPlan
17        isAmlMonitoringAvailable
18        isRiskScoringAvailable
19      }
20    }
21    metadata
22    isKyc
23    isArchived
24    rootEntityId
25    status
26    entities {
27      id
28      info
29      idMonitoring
30      dataRequestInfo
31      createdBy
32      entityChecks {
33        id
34        type
35        status
36        result
37        dataRequestInfo
38        dataRequestId
39        folderId
40        comment
41        input
42        createdAt
43        updatedAt
44        expiredAt
45        createdBy
46      }
47      createdAt
48      updatedAt
49    }
50    createdAt
51    updatedAt
52    comments {
53      id
54      createdAt
55      body
56
57
58      name
59    }
60    folderOnboardingLink
61  }
62}
Variables example
1{
2  "folderId": "7aafc693-c27f-4dd6-a5d1-93fe30f4f8fd"
3}
Object types and field descriptions
Entity checks
To apply additional checks for entities from fast countries or to proceed with checks for entities from slow countries, you must use the
requestEntityChecks mutation that takes the RequestEntityCheckInput scalar type as argument. For more details, look at the explanation in the Variables example part.How to get entity check results, for example for AML:
1. When you perform an AML entityCheck, you get a verification ID
2. When there is an update in the verification, the webhook provides your verification ID. Webhooks are described in the section Real-time updates (Webhook)
3. You take this ID and
1. When you perform an AML entityCheck, you get a verification ID
2. When there is an update in the verification, the webhook provides your verification ID. Webhooks are described in the section Real-time updates (Webhook)
3. You take this ID and
query Folder data by ID.Operation example
1mutation RequestEntityChecks($input: RequestEntityCheckInput!) {
2 requestEntityChecks(input: $input) {
3   id
4   status
5   result
6   dataRequestInfo
7   dataRequestId
8   folderId
9   comment
10   input
11   createdAt
12   updatedAt
13   expiredAt
14   type
15   account {
16     id
17     groupId
18   }
19 }
20}
Variables example
1{
2"input": [
3  {"type": "BUSINESS_INFO",
4   "folderId": "21831f3d-ca25-44a0-9096-f77d34340d1f",
5   "isCorporate": true,
6   "input": {
7     "countryCode": "EE",
8     "name": "Vespia",
9     "registrationCode": "EE102360253"}
10  },
11  {"type": "AML",
12   "entityId": "88e9540e-9e96-419d-9e8f-9670e2a80fd3",
13   "isCorporate": false,
14   "input": {
15     "name": ["Boris", null, "Johnson"],
16     "dob": "06/14/1946",
17     "gender": "male",
18     "country": "UK"}
19  }]}
To pass correctly formatted scalar
RequestEntityCheckInput! you must use an array containing elements that include1{
2 "type": string!,
3 "folderId": string!,
4 "entityId": string!?,
5 "isCorporate": boolean?,
6 "input": {depends on the type value, see table below}!,
7}Use the following pairs of corresponding “type” and “input” as arguments
Response example
1{
2 "data": {
3   "requestEntityChecks": [
4     {
5       "id": "abacba50-61e5-4e18-8cc8-da17419c9dcd",
6       "status": "AWAITING_CHECK",
7       "result": null,
8       "dataRequestInfo": null,
9       "dataRequestId": "f261fd1e-8a26-41bb-b70e-5aeefd11b7f5",
10       "folderId": "21831f3d-ca25-44a0-9096-f77d34340d1f",
11       "comment": null,
12       "input": {
13         "name": "Vespia",
14         "countryCode": "EE",
15         "registrationCode": "EE102360253",
16         "account": {
17           "accountId": "0db81655-893e-4cf5-a339-2235b65a1769"
18         },
19         "folderId": "21831f3d-ca25-44a0-9096-f77d34340d1f",
20         "isCorporate": true
21       },
22       "createdAt": "2024-02-23T11:58:29.382Z",
23       "updatedAt": "2024-02-23T11:58:29.382Z",
24       "expiredAt": null,
25       "type": "BUSINESS_INFO",
26       "account": {
27         "id": "0db81655-893e-4cf5-a339-2235b65a1769",
28         "groupId": null
29       }
30     },
31     {
32       "id": "c3a22e14-4cdc-41a9-9856-a8a45fe70f85",
33       "status": "AWAITING_CHECK",
34       "result": null,
35       "dataRequestInfo": null,
36       "dataRequestId": "3abe9135-de87-42c3-ae5c-db93db592dd8",
37       "folderId": "21831f3d-ca25-44a0-9096-f77d34340d1f",
38       "comment": null,
39       "input": {
40         "isCorporate": false,
41         "name": "Boris Johnson",
42         "gender": "male",
43         "dob": "June 19, 1964",
44         "country": "UK"
45       },
46       "createdAt": "2024-02-23T11:58:29.382Z",
47       "updatedAt": "2024-02-23T11:58:29.382Z",
48       "expiredAt": null,
49       "type": "AML",
50       "account": {
51         "id": "0db81655-893e-4cf5-a339-2235b65a1769",
52         "groupId": null
53       }
54     }
55   ]
56 }
57}
AML Entity check JSON Schema
1{
2  "type": "object",
3  "properties": {
4    "amlList": {
5      "type": "object",
6      "properties": {
7        "image": { "type": "string" },
8        "name": { "type": "string" },
9        "category": { "type": "string" },
10        "matchRate": { "type": "number" },
11
12        "locations": {
13          "type": "array",
14          "items": {
15            "type": "object",
16            "properties": {
17              "country": { "type": "string" },
18              "city": { "type": "string" },
19              "address": { "type": "string" }
20            },
21            "required": ["country", "city", "address"]
22          }
23        },
24
25        "roles": {
26          "type": "array",
27          "items": {
28            "type": "object",
29            "properties": {
30              "title": { "type": "string" },
31              "from": { "type": "string" },
32              "to": { "type": "string" },
33              "country": { "type": "string" }
34            },
35            "required": ["title", "from", "to", "country"]
36          }
37        },
38
39        "aka": {
40          "type": "array",
41          "items": { "type": "string" }
42        },
43
44        "references": {
45          "type": "array",
46          "items": {
47            "type": "object",
48            "properties": {
49              "keyword": { "type": "string" },
50              "description": { "type": "string" },
51              "isCurrent": { "type": "boolean" }
52            },
53            "required": ["keyword", "description", "isCurrent"],
54            "additionalProperties": true
55          }
56        },
57
58        "dob": { "type": "string" },
59
60        "adverseMedia": {
61          "type": "array",
62          "items": {
63            "type": "object",
64            "properties": {
65              "url": { "type": "string" },
66              "categories": { "type": "string" },
67              "dates": { "type": "string" }
68            },
69            "required": ["url", "categories", "dates"]
70          }
71        },
72
73        "linkedIndividuals": {
74          "type": "array",
75          "items": {
76            "type": "object",
77            "properties": {
78              "fullName": { "type": "string" },
79              "description": { "type": "string" }
80            },
81            "required": ["fullName", "description"]
82          }
83        },
84
85        "linkedCompanies": {
86          "type": "array",
87          "items": {
88            "type": "object",
89            "properties": {
90              "name": { "type": "string" },
91              "description": { "type": "string" }
92            },
93            "required": ["name", "description"]
94          }
95        },
96
97        "furtherInformation": {
98          "type": "array",
99          "items": { "type": "string" }
100        },
101
102        "nationality": { "type": "string" },
103
104        "descriptions": {
105          "type": "array",
106          "items": {
107            "type": "object",
108            "properties": {
109              "description1": { "type": "string" },
110              "description2": { "type": "string" },
111              "description3": { "type": "string" }
112            },
113            "required": ["description1", "description2", "description3"]
114          }
115        },
116
117        "gender": { "type": "string" },
118        "uniqueId": { "type": "number" }
119      },
120      "required": [
121        "image",
122        "name",
123        "category",
124        "matchRate",
125        "locations",
126        "roles",
127        "aka",
128        "references",
129        "dob",
130        "adverseMedia",
131        "linkedIndividuals",
132        "linkedCompanies",
133        "furtherInformation",
134        "nationality",
135        "descriptions",
136        "gender",
137        "uniqueId"
138      ],
139      "additionalProperties": true
140    },
141
142    "isClear": { "type": "boolean" },
143    "scanId": { "type": "number" },
144    "isMonitoring": { "type": "boolean" },
145
146    "fatfJurisdictionRiskResults": {
147      "type": "array",
148      "items": {
149        "type": "object",
150        "properties": {
151          "jurisdiction": { "type": "string" },
152          "effectivenessScore": { "type": "number" },
153          "effectivenessLevel": { "type": "number" },
154          "complianceScore": { "type": "number" },
155          "complianceLevel": { "type": "number" },
156          "comments": { "type": "string" },
157          "fatfCompliance": { "type": "string" },
158          "fatfComplianceNotes": { "type": "string" },
159          "fatfEffectiveness": { "type": "string" },
160          "fatfEffectivenessNotes": { "type": "string" },
161          "fatfEffectivenessSubtitles": { "type": "string" },
162          "countryCode": { "type": "string" }
163        },
164        "required": [
165          "jurisdiction",
166          "effectivenessScore",
167          "effectivenessLevel",
168          "complianceScore",
169          "complianceLevel",
170          "comments",
171          "fatfCompliance",
172          "fatfComplianceNotes",
173          "fatfEffectiveness",
174          "fatfEffectivenessNotes",
175          "fatfEffectivenessSubtitles",
176          "countryCode"
177        ]
178      }
179    }
180  },
181  "required": ["amlList", "isClear", "scanId", "isMonitoring"]
182}
AML Monitoring
To enable AML monitoring use mutation
EnableEntityCheckMonitoring with enableEntityCheckMonitoringId argument corresponding to the entity check with "type": "AML"To disable AML monitoring, use
mutation disableEntityCheckMonitoring using the same argumentPage queries
In some cases, you will need pagination and filtering of data. To do so, use
input: PagedQueryInput type. Below is an example query to get a list of your verifications i.e. Folders. Operation example
1query Folders($input: PagedQueryInput) {
2  folders(input: $input) {
3    content {
4      id
5      isKyc
6      name
7    }
8    totalPages
9    totalElements
10    last
11    first
12    size
13    number
14    numberOfElements
15  }
16}
Variables example
1{
2 "input": {
3   "pageRequest": {
4     "page": 2,
5     "size": 10,
6     "sort": [
7       {
8         "direction": "ASC",
9         "field": "Id"
10       }
11     ]
12   },
13   "filter": [
14     {
15       "comparators": [
16         {
17           "field": "isActive",
18           "type": "IS",
19           "value": "true"
20         }
21       ],
22       "operator": "AND"
23     }
24   ]
25 }
26}
Response example
1{
2  "data": {
3    "folders": {
4      "content": [
5        {
6          "id": "08e7b3d9-6eeb-4f39-8844-52f15664f160",
7          "isKyc": false,
8          "name": "Vespia OÜ"
9        },
10        {
11          "id": "e68c6e98-753e-45ed-a91d-4c71d85720b1",
12          "isKyc": false,
13          "name": "Vespia OÜ"
14        },
15        {
16          "id": "ef9104bf-f12e-44b9-bb82-8a190b7dfe9c",
17          "isKyc": false,
18          "name": "Vespia OÜ"
19        },
20        {
21          "id": "75ba70cd-6327-46d5-a509-e1c2b321bd14",
22          "isKyc": false,
23          "name": "Vespia OÜ"
24        },
25        {
26          "id": "273eceba-90b6-427a-9d45-da9984d578a9",
27          "isKyc": false,
28          "name": "Vespia OÜ"
29        }
30      ],
31      "totalPages": 63,
32      "totalElements": 313,
33      "last": false,
34      "first": true,
35      "size": 5,
36      "number": 1,
37      "numberOfElements": 5
38    }
39  }
40}
Input structure, types, and field descriptions
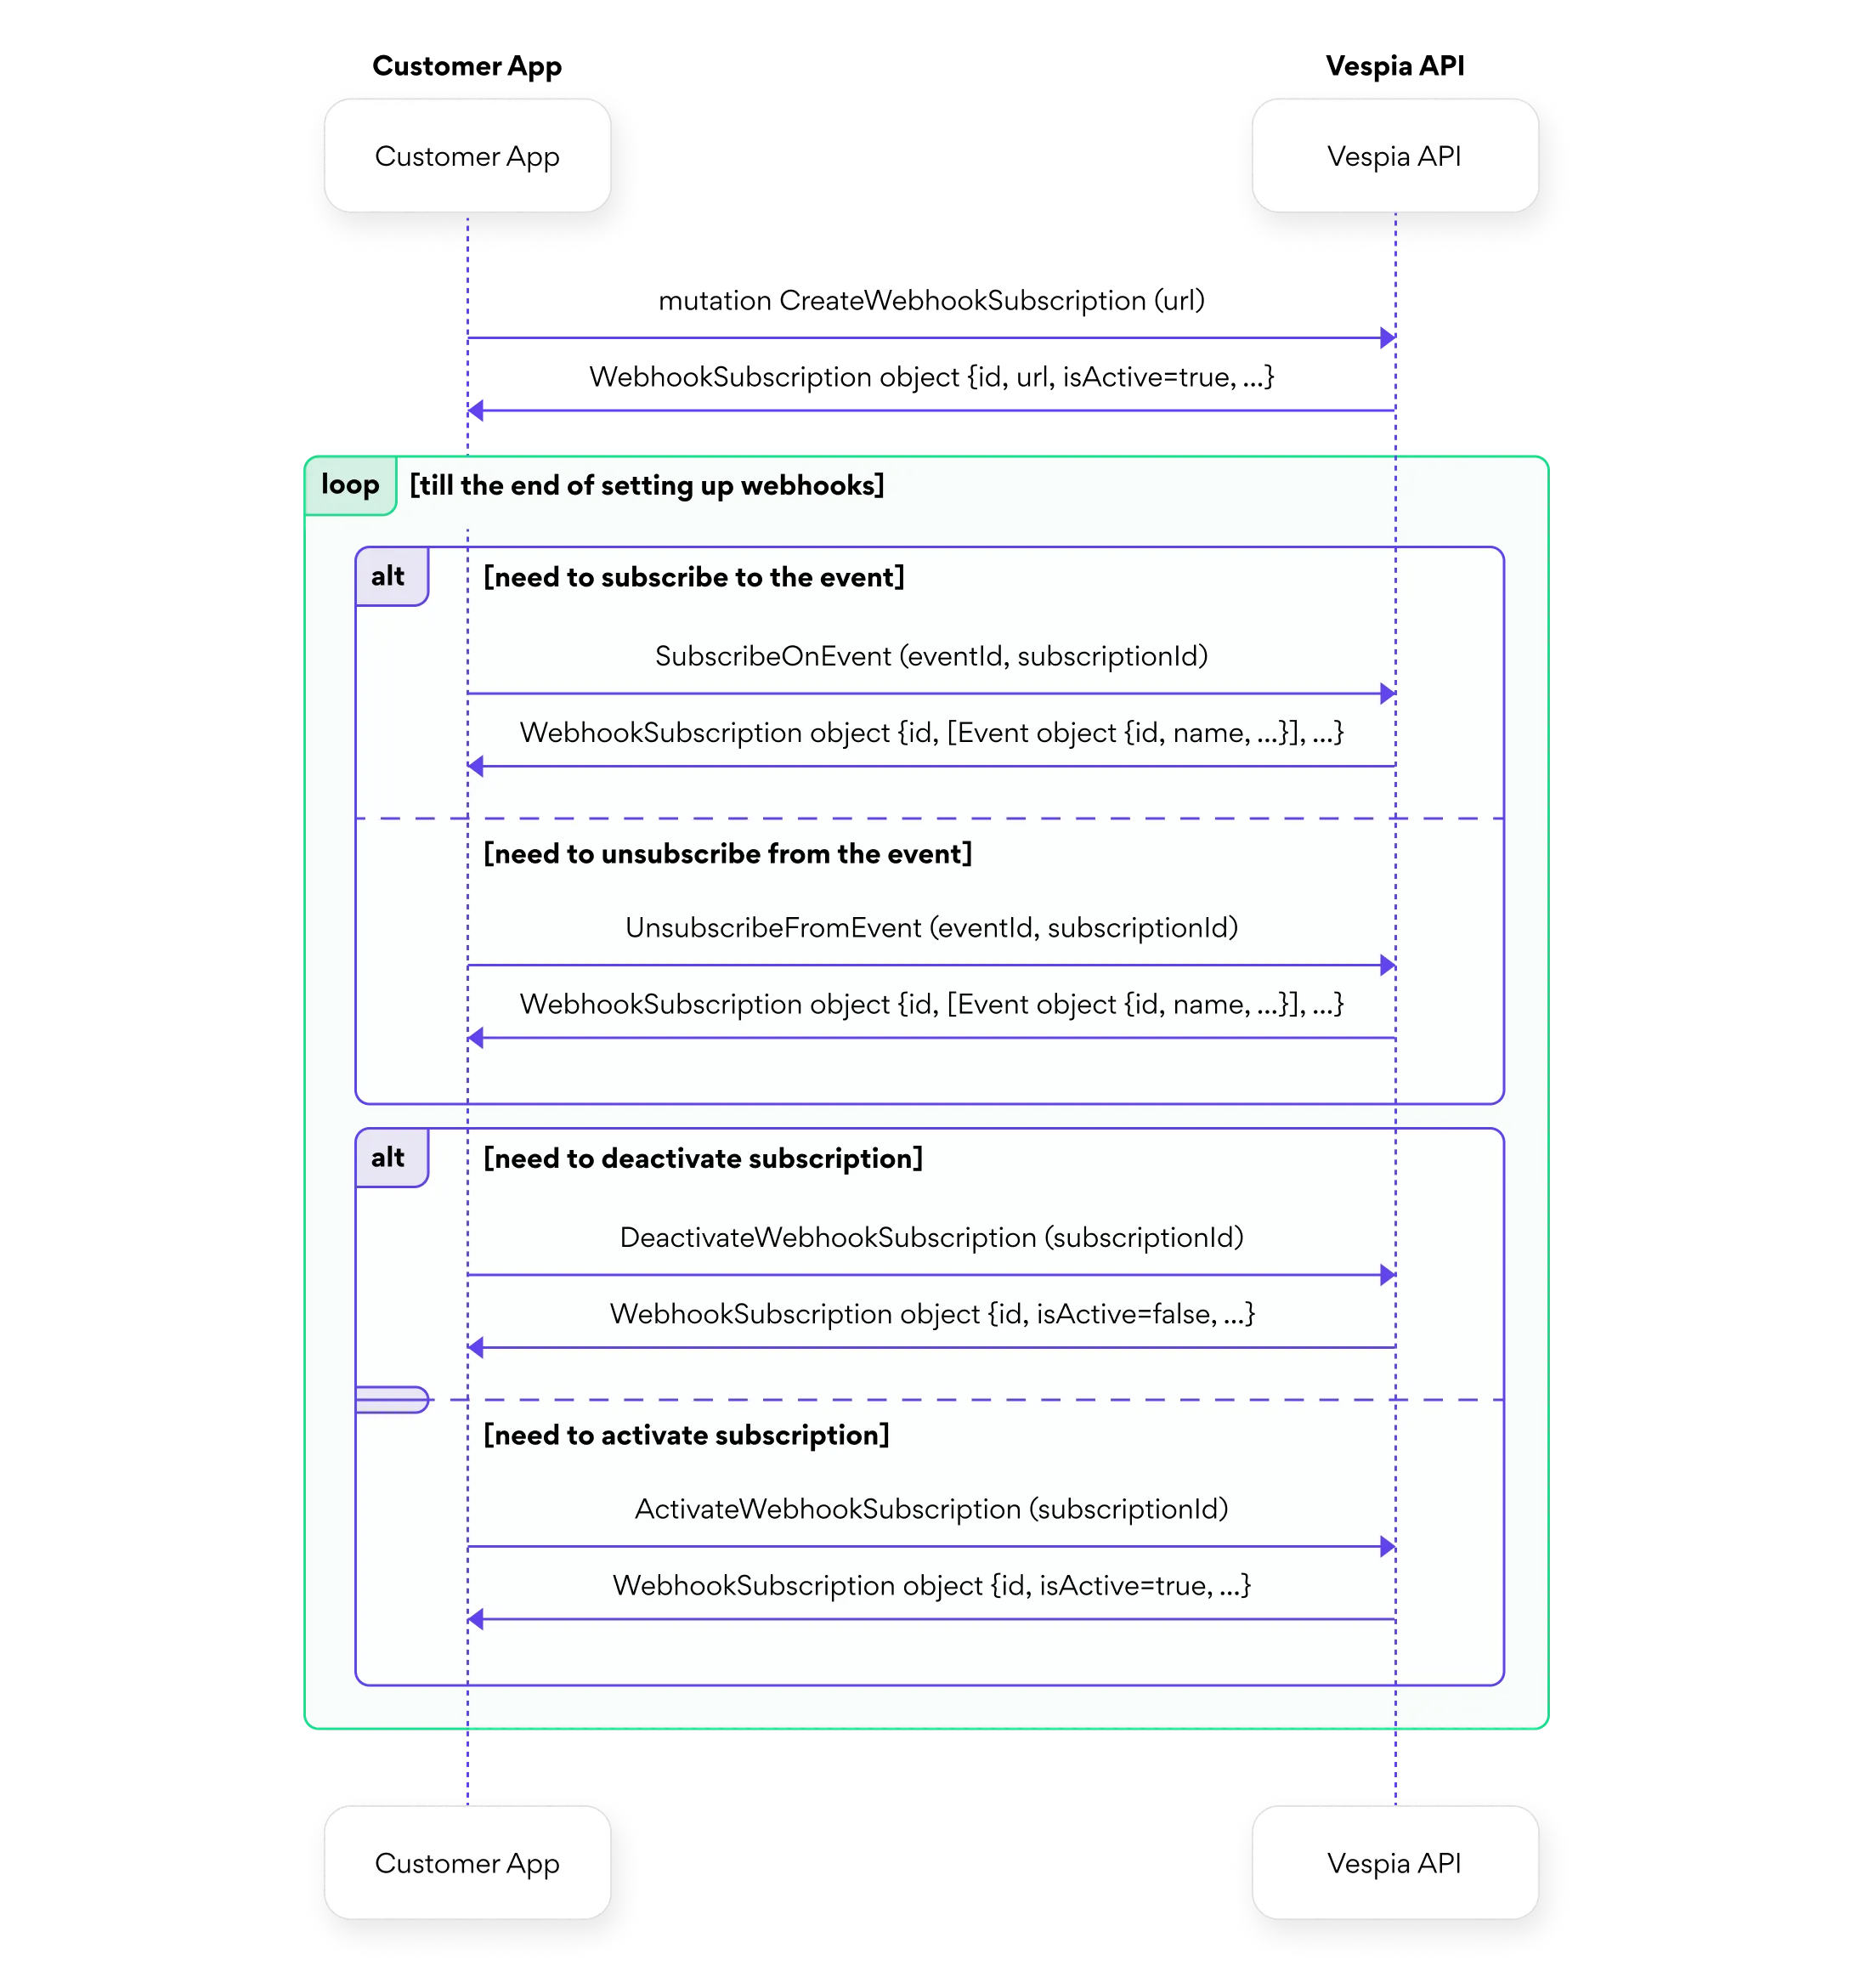
Subscription for real-time information updates (Webhook)
To get access to real-time information updates, we use webhooks. To start using it, you must create a subscription and link it with specific events. This flow is shown in the diagram above.
Please note that you only need to create a subscription once. You do not need to create multiple subscriptions. After creating a subscription as shown below, all the necessary data will be sent to your URL, when events occur.
Diagram
Below is a three-step process (with a sample query and sample input parameters) that will help you subscribe to an event and use the subscription in your project. For example, you can track changes that occur in your checks in a dashboard, and the example below demonstrates this:
1. Let's get the list of events -
query Events. You need to get the event "id" with the name "event.verificationView.built" from the response:Operation example
1query Events($input: PagedQueryInput!) {
2  events(input: $input) {
3    content {
4      id
5      name
6      createdAt
7      updatedAt
8    }
9  }
10}
Variables example
1{
2  "input": {
3    "pageRequest": {
4      "page": 1,
5      "size": 10,
6      "sort": []
7    }
8  }
9}
Output example
1{
2  "data": {
3    "events": {
4      "content": [
5        {
6          "id": "af6918ac-2322-4aba-9341-19e711609289",
7          "name": "event.order.created",
8          "createdAt": "2022-05-17T06:51:45.317Z",
9          "updatedAt": "2022-05-17T06:51:45.317Z"
10        },
11        {
12          "id": "060756a2-0843-404f-96de-7ff48933ed16",
13          "name": "event.verificationView.built",
14          "createdAt": "2022-05-17T06:51:45.317Z",
15          "updatedAt": "2022-05-17T06:51:45.317Z"
16        },
17        {
18          "id": "766f5720-b995-4dfd-95c2-0e4e5d20a03a",
19          "name": "event.wallet.updated",
20          "createdAt": "2022-05-17T06:51:45.317Z",
21          "updatedAt": "2022-05-17T06:51:45.317Z"
22        }
23      ]
24    }
25  }
26}
2. Create subscription -
You need to pass your URL as an input parameter, to which our server will automatically send HTTP POST requests.
From the response, you need to get the
mutation CreateWebhookSubscription. By default, the subscription is activated immediately after creation.You need to pass your URL as an input parameter, to which our server will automatically send HTTP POST requests.
From the response, you need to get the
"id" of the createWebhookSubscription.Operation example
1mutation CreateWebhookSubscription($input: CreateWebhookSubscriptionInput!) {
2  createWebhookSubscription(input: $input) {
3    id
4    url
5    isActive
6    events {
7      id
8      name
9      createdAt
10      updatedAt
11    }
12    createdAt
13    updatedAt
14  }
15}
Variables example
1{
2  "input": {
3    "url": "https://yourdomain.com/webhook-endpoint"
4  }
5}
Output example
1{
2  "data": {
3    "createWebhookSubscription": {
4      "id": "9e3a7978-1040-49c3-979f-6485986779f2",
5      "url": "https://vespia-webhook-url.com",
6      "isActive": true,
7      "events": [],
8      "createdAt": "2025-01-02T14:31:17.299Z",
9      "updatedAt": "2025-01-02T14:31:17.299Z"
10    }
11  }
12}
3. In the input parameters, we specify both identifiers obtained in the first and second steps, which we assign to the property names accordingly -
"eventId" and "subscriptionId"Operation example
1mutation SubscribeOnEvent($input: SubscribeOnEventInput!) {
2  subscribeOnEvent(input: $input) {
3    id
4    url
5    isActive
6    events {
7      id
8      name
9      createdAt
10      updatedAt
11    }
12  }
13}
Variables example
1{
2  "input": {
3    "subscriptionId": "9e3a7978-1040-49c3-979f-6485986779f2",
4    "eventId": "060756a2-0843-404f-96de-7ff48933ed16"
5  }
6}
Example of deactivating a subscription
In the input parameter, you must pass the subscription
"id" that was created earlier in the first step.Operation example
1mutation DeactivateWebhookSubscription($deactivateWebhookSubscriptionId: UUID!) {
2  deactivateWebhookSubscription(id: $deactivateWebhookSubscriptionId) {
3    id
4    url
5    isActive
6    events {
7      id
8      name
9      createdAt
10      updatedAt
11    }
12    createdAt
13    updatedAt
14  }
15}
Variables example
1{
2  "deactivateWebhookSubscriptionId": "0a68dc26-1afb-4dd1-ba64-3a196321cf41"
3}
There are 3 events available currently:
event.order.createdevent.verificationView.built- fires when there are updates in the folder.event.wallet.updated- fires when the wallet is updatedTo get an actual list of events and their IDs use query Events
There are 3 events To manage subscriptions, use the following
mutations: